Search This Blog

Tuesday 26 April 2011

Anderson Shelter Restoration: Day 15

Today, I set out to complete work on the final panel, paint it, and then finish the day by laying out all the panels like we did on day 1 of the project and photograph the newly restored shelter.


The first job was to mark all the areas of imperfection from the previous day's filling; I used chalk to circle these, that way I would be able to fill in the areas appropriately.


After a lot of sanding, refilling, sanding etc. etc. I got a finish I was happy with on the inside of the panel; once the shelter is in place in the ground, this will be the only surface visible!
Next, the panel was painted with rust-protecting silver paint. When I looked at my watch, I realised that this 'little' job had taken six and a half hours!


The panel was left to dry, while I tidied the potting shed. Hooks were put in place to hand the garden tools from, and room was made in preparation for the completed shelter panels to be stored.


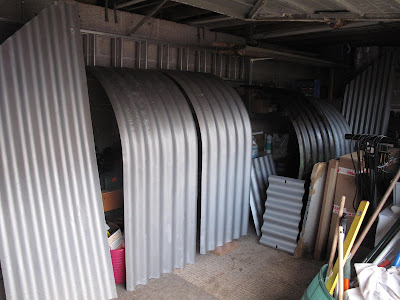
Once the paint was completely dry, it was time to lay out the panels and admire our workmanship! The following photos show the completed panels, minus the 3 rectangular end panels. These will be cut from the corrugated sheet being donated by Plymouth City Museum, which should be a relatively easy job, as will painting them.


The completed Anderson 'kit' with one of the original 'scrap' pieces; many of the panels were damaged like this!
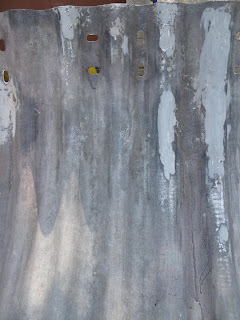
 What it looked like before work began!


The Anderson in its temporary home in the potting shed; it will soon be in the ground! 

At this stage of the project, as we near completion, I would like to thank all those people who have helped out and given their time freely to assist with the renovation of the Anderson shelter. It will not only enhance our 1940s garden greatly, but I hope it will also give the children a real understanding of what ordinary people went through during the dark days of the blitz, and how their own lives would've been affected had they been alive during the war. 

Thank you to Roland at Plymouth City Museum for helping with the initial location and collection of shelter, and for providing additional materials to help complete it.

Thanks also to Debbie & Tom for your help with the painting; it is very much appreciated! It has been lovely to hear all the comments from colleagues and parents who have been keeping up to date with the progress made during the project, and showing great interest when passing by on their way to collect their children from school. Thank you to Lucy for regularly providing us with coffee; this was a vital part of the success of the project!

Lastly, I would like to thank Kay for her dedication and support throughout not only this, but all of the projects within the school garden over the last 3 years. She has always given her time freely, faced every challenge with enthusiasm and good humour, and managed to keep all of her limbs, despite some rather 'extreme' angle-grinding!! Her help is appreciated enormously.

The next task will be to design and make the base for the shelter to be located on within the ground. . .watch this space!!

Sunday 24 April 2011

Anderson Shelter Restoration: Day 14

Today we finished painting side panels 4 & 5 with rust-protecting silver top coat, and continued repairs on the final side panel. All was going well, with the holes repaired and the strengthening panel sealed and bolted into place, when we realised that we would run out of chemical metal before all the repairs were finished. Unfortunately, being Easter Sunday, all the shops were closed, and further work had to be put on hold. With one day of holiday left, the final panel has to be completed tomorrow. . .!!


With work on the Anderson shelter put on hold, we decided to do some tidying and preparation in the garden. The raised bed we moved to make way for the aircraft parts was lined along the bottom with weed-control matting, so it can eventually be filled and used for growing, in its new location outside the school's kitchen. This will probably contain pumpkins and squashed later in the summer.

We also moved the potato sacks / hessian bags to a more convenient position, which involved laying some more weed-control matting first. Finally, 6' canes were placed along 3 edges of the potato bed in preparation for planting out the sugar snap peas next month. Willow was weaved between the upright canes to give the pea plants something to cling on to as they grow.

Saturday 23 April 2011

Anderson Shelter Restoration: Day 13

We had yet another productive day today, and by the end we had almost completed 2 of the remaining 3 side panels; they now only require a final silver top coat tomorrow and they will be finished.  

Here the repaired panel has been sanded down in preparation for painting with undercoat.
Once painted, these repairs will hopefully be invisible.
The edge of this panel had rusted away; metal gauze and chemical metal was used to build it back up again.
One of the 3 remaining side panels receiving a coat of white undercoat. This is the panel that we had to repair the bottom of as it was too badly damaged with rust. We used a spare piece of corrugated metal from a side panel we acquired, and bolted it into position.
The second of the 3 remaining panels gets a coat of undercoat.
The inside of this panel was also given a silver rust-protecting top coat in the afternoon. The outside surface will be finished tomorrow.
Work then started on the final panel. Again, due to the fact that this panel is badly rust-damaged, a plate has been added to the upper surface to strengthen the side panel and to allow the inside to be repaired more easily. Again, this section was cut, with the angle-grinder, from the spare panel we acquired. Once finally bolted in place, the edges of this patch will be sealed to prevent any moisture seeping in, and causing more rust problems. 

We used counter-sunk headed bolts to try and make the heads as flush as possible against the inside of the panel as this will be noticeable once the shelter is constructed - we may skin these over with chemical metal too to disguise them completely from the inside prior to painting.

Also during the day, we found time to plant the two salad beds in the garden, which will provide the school kitchen with a mixture of fresh lettuce leaves, mustard, radish, carrots & spring onions to be used for the children's school dinners.

All in all, it was a very productive day, and we hope to complete the last panel tomorrow. . .despite it being Easter Sunday!!

Friday 22 April 2011

Anderson Shelter Restoration: Day 12

Work continued today on the remaining 3 panels; by the end of the day, 2 were almost ready for painting with only a small amount of filling/sanding left to do. These will be finished tomorrow, and we will begin to restore the final side panel. 

These pictures show today's progress:


 If nothing else, we've succeeded in making a dog shelter!!


This badly damaged panel was repaired with an additional plate, which was bolted into position, after being cut from a spare piece of corrugated material.

Another job we decided to start was the restoration of an original A.R.P. First Aid box. This will eventually house an mp3 played to play period music in the garden! We began to strip the paint off, which had become badly worn over the years.
After stripping the paint off with the blow torch, we discovered that someone had obviously used the box after the war as a school box / lunch box at some point, as a name, class and date were clearly visible, scratched into the upper surface.

The inscription reads 'David George McGaffog; Form 4a; 18/6/ ? '


The Fire Watcher's helmet, which was rust-proofed yesterday, also received a coat of filler primer in preparation for painting. This will be sanded down with wet & dry, re-primed and painted with a light grey top coat (original colour) with the letters 'SFP' (Supplementary Fire Party) stencilled in white on the front.

Thursday 21 April 2011

Anderson Shelter Restoration: Day 11

Today we continued to work on the remaining 3 side panels of the Anderson shelter. As these are the most corroded of all the panels, they required a lot of grinding, brushing and rust-proofing.

One of the panels had also lost a considerable amount from its lower edge due to corrosion, so it was decided that in order to make sure the panel was strong enough to withstand the weight of soil on top of it once it was buried in the ground, we would cut a new base plate from our spare corrugated piece to attach onto the damaged piece with bolts. This too had to be ground, wire-brushed and rust-treated. 

We also decided to use another section of the spare panel, this time an upper curved piece, to place over the top of one of our badly corroded panels. This way, once filled and sanded down, the finished panel will not only look good, but will also maintain its strength. 

Here are a selection of photos from today's work - the helmet in the picture below is a 1939 dated SFP (Supplementary Fire Party) helmet used by fire watchers during the war. This will be restored to its original colour scheme with markings once it has been rust-protected.


Wednesday 20 April 2011

Anderson Shelter Restoration: Day 8, 9 & 10

The last 3 days have been spent putting the finishing touches to the previously restored panels, and in some cases, giving them a second coat of silver top coat to produce the desired finish. 

With these completed, there are now only the remaining 3 curved side panels left to restore, and the rectangular back pieces to be fabricated from new corrugated metal sheeting, once again donated by Roland from Plymouth City Museum.

Unfortunately, the final 3 panels are probably the worst effected by rust, as can be seen in the picture. The panel shown has been cleaned up with the wire brush / angle grinder, and then rust protected; but there is still a lot of repair work to do. We will begin repairing this one tomorrow, and possible make a start on the next one.

The picture below is much more pleasing; this is a view of the restored and painted panels inside the garage. No further work is required on these panels.


As well as all the restoration work,we have also been busy preparing the raised beds ready for planting. Some of the children who attend the school's holiday club very kindly gave the outside of the beds a coat of wood preservative on Tuesday afternoon, and they now look significantly better as a result. Well done guys!

Another piece of good news; I heard today that we are to take delivery of our aircraft parts (fabricated by the apprentices at Babcock Marine, Plymouth) at the end of next week - these will then need spraying before installing them as a permanent 'Battle of Britain' feature in the 'Dig for Victory' garden.

Sunday 17 April 2011

Anderson Shelter Restoration: Day 5, 6 & 7

On Friday, I arrived at the garden to find that the hole had been dug for the Anderson shelter! 

To my surprise, it is almost perfectly rectangular, and should make locating the shelter in position much easier.

A local business (details to be disclosed at a later date) donated a mini digger and the manpower to dig the 3 foot-deep hole, which measures 6'6'' x 4'6". This has saved us an enormous amount of time and effort, and we very much appreciate it.


During the rest of the day, we painted silver top coat on some of the previously restored and undercoated sections of the shelter, filled sand bags in preparation for installing the shelter, planted some more potatoes in some spare sand bags and moved a raised bed to make room for the German fighter aircraft wreckage that should be delivered at the end of the month. 

Luckily, I had lots of help during the day, which turned out to be very productive!


'Winston' potatoes planted in sand bags.


On Saturday, we continued restoration work on the next two side panels of the shelter. This involved wire brushing, angle-grinding and rust-proofing. 


These two panels are probably the best of the 5 we had left to do, and only required minor repair work, although this still took most of Sunday to complete!


Once treated, we began repairing holes using wire gauze and chemical metal. in some cases, this meant reforming corners of the panels which had rusted away. 

This was a little fiddly, but the job turned out well in the end. Once filled / moulded, these repairs then required sanding in order to produce a surface which could then be painted. 


As a bit of light relief, I decided to put some period anti-blast tape on the greenhouse to match the potting shed! Looks quite good!


As well as preparing the next 2 side panels for painting, we also did some more planting on Sunday. In the largest bed, we decided to sow some root vegetables rather than opting for potatoes as we have for the past 2 years. This is what we planted in the bed:

  • Swede (Gowrie)
  • Shallots (Golden Gourmet)
  • Garlic (Picardy White)
  • Carrots (Early Nantes 5)
  • Parsnip (F1 Gladiator)
  • Turnip (Purple Top Milan) 
  • Beetroot (Detroit 2 - Crimson Globe)
After a busy day, I finished off by weeding and tidying the herb garden, which is looking surprisingly healthy after very little attention over the winter months. A very productive 3 days!